Introduction
Flyovers and underpasses are used where roads cross at different levels without intersecting. When first creating a flyover/underpass it’s not important which road passes under or over the other road, but it is important to make sure the two roads don’t create an intersection where none exists. If intersections are created by accident, navigation will report turns that aren’t possible in the real world. Although turn restrictions could be applied to fix the navigation, Map Maker provides a better mechanism for handling these roads.
There are many ways to create non-intersecting roads including: 1) adding a new road using the Road Flyover / Underpass category, 2) editing an existing road and dragging that road over/across other roads, and 3) deleting intersections at the flyover/underpass location. That last option is tricky at best since most intersections cannot be deleted, but it works often enough to be worth mentioning. All three methods can produce the same results.
After creating a Flyover/Underpass segment, specify the grade level attribute. This attribute affects not only how roads are rendered (over and under), but also affects how new roads will behave where they cross. Overpass roads are drawn above surface roads. Underpass roads are drawn below. Roads with a grade level specified for the Middle cannot be split so new roads will never intersect.
The flyover/underpass should be created using the shortest possible segment. For example, a bridge should have an intersection at either end. Only apply the grade level attribute to a short flyover/underpass segment, not an entire road. If the grade level attribute is applied to a long road segment that happens to include the bridge, it won’t be possible to connect new roads or trails since these underpass/overpass segments cannot be split.
In this guide I’ll be explaining how to use the Road Flyover / Underpass category to create a new flyover/underpass segment. This category, when selected, will only allow a new road to start and end at existing surface intersections. You cannot split an existing road segment when drawing a flyover/underpass road so you’ll need to make sure you start and end at an existing intersection. See the example below.
Creating a new Flyover/Underpass
Step 1. Draw a normal road up to the beginning of your flyover/underpass. In this example I’ll be adding a second flyover parallel to an existing bridge.
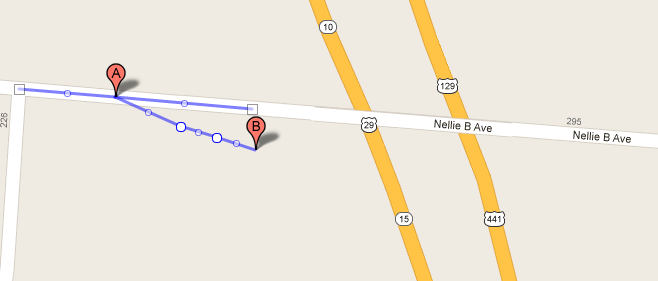
Notice that I’m only drawing this segment up to the beginning of the bridge. You can see the nearby road also has an intersection at the beginning of it’s bridge. This new segment has a grade level of surface/surface/surface. For now, use the Local priority and don’t specify any segment usage. We’ll set both of those as the last step in our edit. By not setting the priority and segment usage at this time, we’re more likely to complete our new road with possibly only one review needed.
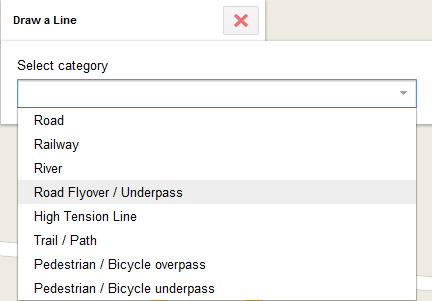
Step 2. Draw the flyover/underpass segment. Select the Road Flyover / Underpass option found under Draw a Line.
Notice this new segment doesn’t create intersections with the highway below the bridge.
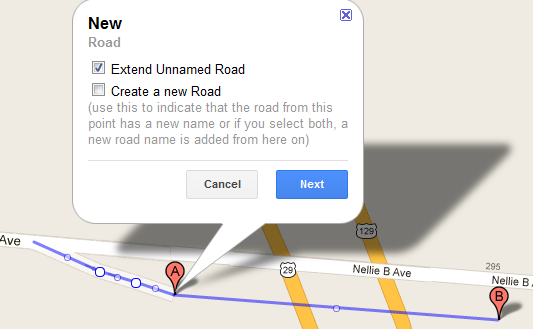
If we had not selected the Road Flyover / Underpass option we would see two new intersections between this new segment and Highway 29/129. If this happens by accident you should abort the current edit and start over using the correct line category.
At this point you should specify the grade level (Surface / Overpass 1 / Surface) and possibly the surface type (Concrete in my example). The other attributes will usually carry over from the first segment (priority, lanes, direction, etc). Make sure the priority is still Local and the segment usage is still blank.
Step 3. Complete the road. Draw a normal road segment from the end of the bridge to connect where needed. Set the direction, lanes, surface type as needed, but continue using the Local priority and no segment usage.

Step 4. Set the road priority and segment usage (optional). If the road you are adding isn’t a local road (Artery, Freeway, etc) or needs segment usage (Ramp, Interchange, etc) set these attributes last since these often require moderation/review. Use the segment tool to highlight the three new segments, edit the priority and specify the segment usage, save and voila! You’re done. Of course there may be other factors including route names and attributes on other roads, but those issue belong in a different guide.
Important notes about Flyover/Underpass segments:
1. It’s impossible to create an intersection on a road (split a segment) with the middle grade level set to anything other than Surface. If you’re having trouble getting a new road to connect to an existing segment, check the grade level on that segment and reset it to Surface if necessary. After changing the grade level back to Surface, create the intersection (split the segment) and then restore the proper grade level to the proper segment(s). This can get complicated when there are intersections on bridges.
2. Changing grade level will not magically remove intersections! If you created intersections by accident when drawing a bridge, you must abort the edit. If you’ve already saved the edit, you can try to delete the intersections. If that fails, you must delete all of the new segments and start over again.
3. Only set the Begin and End grade level if you have an intersection in the middle of a Flyover/Underpass.
4. Only one of the crossed roads needs to have the grade level specified. 99% of the time this will be the Overpass 1 grade level on the upper road. Specifying Underpass 1 is only rarely needed, and is most common when the road passes under a bridge that crosses a river. The above road would still be considered Surface level and would probably have the Bridge elevation attribute set as well.
No comments:
Post a Comment