Friday, November 15, 2013

Mapping Your First Parking Lot

A parking lot is a great place to start learning how to map roads. Mistakes here won't normally get anyone lost and many of the more complicated aspects of road names and routes can be avoided for now.

However, this is still an advanced blog, so I'm not going to repeat everything found on the Map Maker help website. I'll assume you can at least navigate the Map Maker page and that a verbal description of selecting tools will suffice.

Let's begin...

Start at the entrance. Our first edit will be simple as there are no turn segments or split roadways (divided roads needing parallel one-way segments). Find the parking lot in Map Maker, zoom is as far as possible (this can vary in different places), and then click the Add Roads Rivers, Railways in the Add New menu.

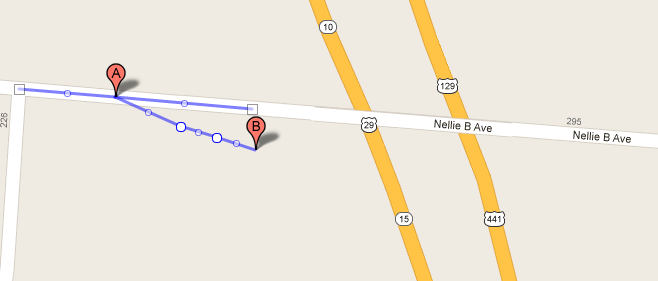
Set the very first point directly at the point our new entry segment will connect to the main roadway outside the parking lot and then add more points to continue that entry as far as possible, but do not continue this road by making any turns at intersections! Here's our first example:


Notice the first point was directly on the roadway and we only went to the first intersection. You might be tempted to continue drawing your line as far as possible, around corners and such, to get as much done in one edit as possible. It can be done, but edits like that are fraught with problems where roads won't connect properly and segment usage cannot be set properly.

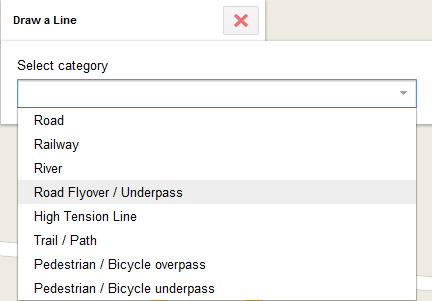
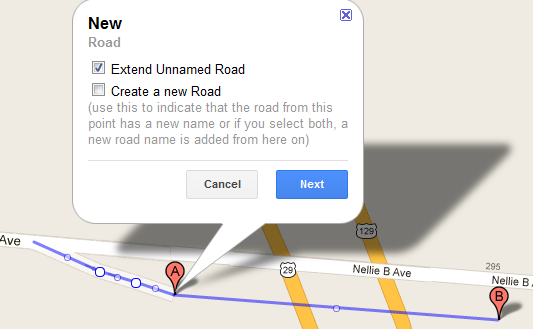
Click Done and you will get a popup like this:


Clear all check boxes except for the "Create a new Road" box. This is a new road. Checking any of those boxes will cause those routes (and road names) to be copied onto our new road. We don't want that. This is a new road. If we draw the parking lot correctly, almost every road we add will be a new road. Click Next to continue.


Note: since this blog was written, Google's policy on parking lots has evolved a little. We're still supposed to mark all segments with the Enclosed Traffic Area/Parking Lot segment usage, but we're now supposed to mark thoroughfares with the Local priority and parking aisles with the Terminal priority. Marking thoroughfares with the Local priority is not required, but helps with navigation directions. In the rest of this tutorial we'll only be using the Terminal priority, but I will add information on which segments can be set to the Local priority.
See https://support.google.com/mapmaker/answer/1709127?hl=en for more information on the Enclosed Traffic Area/Parking Lot segment usage.
Here we fill out the important information about this new road. The Local or Terminal priority for thoroughfares or aisles, number of lanes, maximum speed, and Enclosed Traffic Area/Parking Lot segment usage are important. The defaults on everything else is usually sufficient, but can be adjusted as needed. Click Save and get this:


As much as you'd like to continue mapping here, we can't. This pending edit will prevent any new edits from being configured correctly. You can try, but the attribute screen won't show up and you'll likely attempt to create a road with the wrong priority and wrong segment usage. This is what you'd see:


Don't do this! Be patient. In the meantime, maybe go to the other side of the parking lot and add another segment. As long as they don't touch, or touch the same road, you can create another segment and eventually get everything connected.

OK, so that previous edit finally gets approved and we add the next segment. This may seem tedious and may seem like it will take more time, but it actually goes faster because these edits come up for review faster than "pending" edits, and you'd still have to go back and change that segment to get the attributes right which means it takes much longer doing it the wrong way (unless a reviewer does all the work for you...but that's not why we're doing this...is it?).


When we click Done we'll see another of those "Extend" or "Create" popups. Again, this is a new road, so select "Create a new Road." Set the priority to Terminal (or Local for thoroughfares), Lanes will probably already be correct (2 is the default), the speed should be set appropriately (15 mph is normal) and add that Enclosed Traffic Area/Parking Lot segment usage. Click Save and then work somewhere else while waiting for an approval. As you can see below, I went ahead and added another segment starting at a different entrance. I'm now able to wait for either of these to get approved before moving on.


Things start getting really exiting as we make more progress. My next edit looks like this. One continuous segment which represents a route that doesn't involve making any turns (just curves).


My next edit is rather simple, but it does something special. Adding this segment will split the parking lot in two parts which can each be worked on separately without worrying about the pending edit problem. I'll show you on the next edit.


Once this was approved I was able to add the back parking lot entrance and one of the parking aisles without running into a pending edit. I then added the long segment across the west end of the parking lot and the next parking aisle on the south side.


OK, so two edits at a time isn't very exciting, but there's another parking lot across the street I can start on as well so I just keep this up until everything is added...


And as a reward, we've received an excellent edit record!


Thanks for reading!

Jay

The Correct Way to Rename a Road

Routes and Road Names

Google doesn't explain how road names, routes, and segments are related in Map Maker, so even experienced mappers often don't understand the implications of changing road names. Let me explain a few basic concepts and then we'll get into the proper way to change a road name.

Segments: these are the pieces of road or trail between intersections. Each segment can have it's own unique attributes and can be associated with one or more routes. A segment is always associated with at least one route, but that route may be "Unnamed." Here is an example of a segment associated with two routes ("Georgia 403" and "Interstate 85"). Notice the two "Edit entire <route name>" options.


Routes: (also sometimes called Roads in Map Maker) these are used by Map Maker to tie multiple segments together and can optionally carry one or more names. Some routes are unnamed, and aren't obvious to the casual mapper, but they're still there on every segment. Here is an example of a route with multiple names:


So changing a name can actually be quite confusing. You can change the name by editing the name of the route, by adding an existing route to a segment, removing a route from a segment, or by creating a new route and adding that route to the segment. It's easy to have unintended consequences of making a change without understanding how the routes and road names work together.

Changing a Road Name: the Wrong Way

Let's stay away from major highways and complicated routes for now and focus on a simple road name change. For example, the local government wants to change the name of a road and the old road name needs to be removed and a new name added. We can discuss whether to keep the old name as an "obscure" name at some other time, but for now let's just assume we want the old name to go away completely.

If you use the Select a Line tool in the Edit menu and click on a segment, you will see an option to "Edit entire <road name>". If the route is unnamed, it will just say "Road" instead of <road name>.


If we click on "Edit entire <road name>" we get a dialog like this and can change the name fairly easily:


Here's an example of the edit history for a different road where the route name was changed. Notice the changes show up as "Name: deleted / added".


So what's wrong with changing the name here? Map Maker never really forgets the route's original name. I don't know why, but it will remain there forever as you can see here when looking back a road that was changed from "Raintree Drive" to "Bailey Drive." The original name still shows up in the address portion of the segment.


This method also doesn't allow us to change only part of an existing route.

So why does this option exist? If a route has multiple names you can use this option to add, edit, or delete those additional names. See the information on Routes in the intro above.

The Correct Way to Change a Road Name

Your friend here is the Select Road Segments tool (under the Edit menu). This tool allows you to add or remove a route from a group of segments. To fix the above road we'll highlight both segments at once like you see below, click Next, and then click Edit road names:


We're going to fix this road by removing the existing route (which shows the name "Bailey Drive", but has the hidden name of "Raintree Drive"). If you see a route labelled "Unnamed" you should also remove that route. Also, if there are multiple routes that need removed, you might have to perform multiple edits: Map Maker will only remove one route at a time if the routes are on different segments.


Note: click the selector for "Type" next to the name and select "Local" (name is in the local language), "Primary" (for only one name if adding multiple names), and "Official" (assuming this is an official, as opposed to a commonly used name).

When we're done, the road will look the same initially, but will show the correct address. A history of this edit will look like this (note the "Removed route" and "Created new route"):


When viewed from Map Maker we see the address is now correct:


Extending a Route

If a route already exists on the map, or the route you want to rename branches into multiple paths (divided highway or loop) use Map Maker's Extend option in the Edit road names tool.

Important: When using the Edit road names tools, every time you enter a name in the space under Add a new name you are creating a new route. We don't want to create multiple routes with the same name so if the route already exists or we need to name/rename a road that branches, instead of creating a new route, we extend the existing route. That is, we can add more segments to an existing route.

Important: if you are a new editor or editing a high priority road, and your first edit to create a new route doesn't go live immediately (i.e. needs to be reviewed) you will need to stop at this point and wait for approval on your edit. You cannot continue and still perform the edit properly because you need the new route to be "live" before you can continue. Adding meaningful comments to your edit will greatly increase the odds that it will get approved!

Here's the trick to extending a route: select segments of the existing route along with the segments that need changed. In the image below we've selected part of a newly named South Oneida Street along with segments from Oneida Street which need changed to South Oneida Street:


Click Next and choose the option to extend the new name and remove the old name like this:


Click Save. Rinse and repeat until you've extended the new route to all of the segments needed. If the road branches go down one branch first and then come back and do the other branch the same way...always selecting a segment that already has the route and more segments that need changed.

You will never type in the road name twice!

Reviewers will know you got the edit right because they won't see "Created new route". They'll see "Added route" instead:


Notes:
  • Do not use this technique to remove valid routes! Sometimes a route contains multiple names and you might be removing a name without even realizing it.
  • This renaming technique will often fix missing road names on the map.
  • If adding more than one name to a route, the Primary road name attribute determines which name will appear when editing the road.
  • When multiple routes follow the same path, all non-obscure, primary names will appear on that road (if they fit).
  • In some cases, different parts of a road may not be connected making it difficult to extend the name. The usual trick is to temporarily extend the route over a connector segment and once the route is carried across, remove the route from that connector segment. Make sure to explain this in any edit which needs reviewed or you will get denied!

Thursday, November 14, 2013

Advanced Flyovers/Underpass Guide


Introduction


Flyovers and underpasses are used where roads cross at different levels without intersecting. When first creating a flyover/underpass it’s not important which road passes under or over the other road, but it is important to make sure the two roads don’t create an intersection where none exists. If intersections are created by accident, navigation will report turns that aren’t possible in the real world. Although turn restrictions could be applied to fix the navigation, Map Maker provides a better mechanism for handling these roads.


There are many ways to create non-intersecting roads including: 1) adding a new road using the Road Flyover / Underpass category, 2) editing an existing road and dragging that road over/across other roads, and 3) deleting intersections at the flyover/underpass location. That last option is tricky at best since most intersections cannot be deleted, but it works often enough to be worth mentioning. All three methods can produce the same results.


After creating a Flyover/Underpass segment, specify the grade level attribute. This attribute affects not only how roads are rendered (over and under), but also affects how new roads will behave where they cross. Overpass roads are drawn above surface roads. Underpass roads are drawn below. Roads with a grade level specified for the Middle cannot be split so new roads will never intersect.


The flyover/underpass should be created using the shortest possible segment. For example, a bridge should have an intersection at either end. Only apply the grade level attribute to a short flyover/underpass segment, not an entire road.  If the grade level attribute is applied to a long road segment that happens to include the bridge, it won’t be possible to connect new roads or trails since these underpass/overpass segments cannot be split.


In this guide I’ll be explaining how to use the Road Flyover / Underpass category to create a new flyover/underpass segment. This category, when selected, will only allow a new road to start and end at existing surface intersections. You cannot split an existing road segment when drawing a flyover/underpass road so you’ll need to make sure you start and end at an existing intersection. See the example below.


Creating a new Flyover/Underpass


Step 1. Draw a normal road up to the beginning of your flyover/underpass. In this example I’ll be adding a second flyover parallel to an existing bridge.


Notice that I’m only drawing this segment up to the beginning of the bridge. You can see the nearby road also has an intersection at the beginning of it’s bridge. This new segment has a grade level of surface/surface/surface. For now, use the Local priority and don’t specify any segment usage. We’ll set both of those as the last step in our edit. By not setting the priority and segment usage at this time, we’re more likely to complete our new road with possibly only one review needed.


Step 2. Draw the flyover/underpass segment. Select the Road Flyover / Underpass option found under Draw a Line.


Notice this new segment doesn’t create intersections with the highway below the bridge.


If we had not selected the Road Flyover / Underpass option we would see two new intersections between this new segment and Highway 29/129. If this happens by accident you should abort the current edit and start over using the correct line category.


At this point you should specify the grade level (Surface / Overpass 1 / Surface) and possibly the surface type (Concrete in my example). The other attributes will usually carry over from the first segment (priority, lanes, direction, etc). Make sure the priority is still Local and the segment usage is still blank.


Step 3. Complete the road. Draw a normal road segment from the end of the bridge to connect where needed. Set the direction, lanes, surface type as needed, but continue using the Local priority and no segment usage.


Step 4. Set the road priority and segment usage (optional). If the road you are adding isn’t a local road (Artery, Freeway, etc) or needs segment usage (Ramp, Interchange, etc) set these attributes last since these often require moderation/review. Use the segment tool to highlight the three new segments, edit the priority and specify the segment usage, save and voila! You’re done. Of course there may be other factors including route names and attributes on other roads, but those issue belong in a different guide.


Important notes about Flyover/Underpass segments:


1. It’s impossible to create an intersection on a road (split a segment) with the middle grade level set to anything other than Surface. If you’re having trouble getting a new road to connect to an existing segment, check the grade level on that segment and reset it to Surface if necessary. After changing the grade level back to Surface, create the intersection (split the segment) and then restore the proper grade level to the proper segment(s). This can get complicated when there are intersections on bridges.


2. Changing grade level will not magically remove intersections! If you created intersections by accident when drawing a bridge, you must abort the edit. If you’ve already saved the edit, you can try to delete the intersections. If that fails, you must delete all of the new segments and start over again.


3. Only set the Begin and End grade level if you have an intersection in the middle of a Flyover/Underpass.


4. Only one of the crossed roads needs to have the grade level specified. 99% of the time this will be the Overpass 1 grade level on the upper road. Specifying Underpass 1 is only rarely needed, and is most common when the road passes under a bridge that crosses a river. The above road would still be considered Surface level and would probably have the Bridge elevation attribute set as well.


Send email to jfcotton@gmail.com if you have any questions or comments. Thanks!

Advanced Route Naming


This content has been moved to The Correct Way to Rename a Road. Thanks!